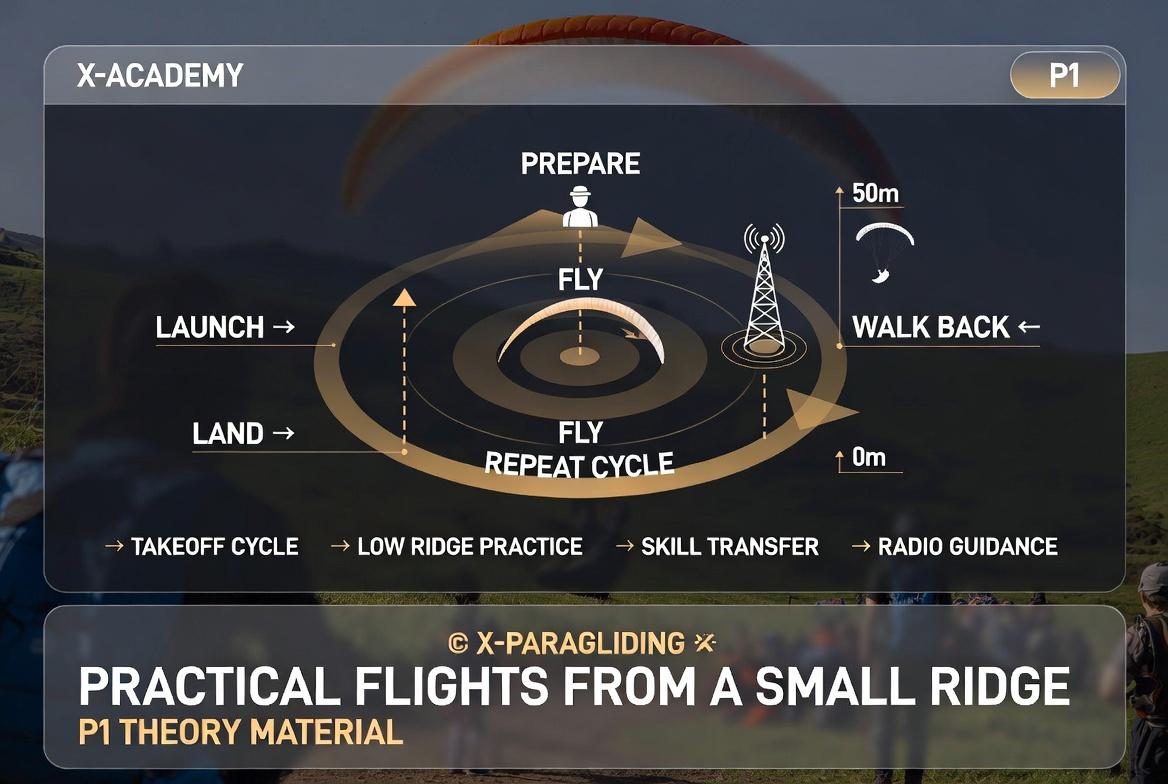
Practical training on a low mountain ridge is one of the most vital stages of paragliding education. This is where skills learned during ground handling are transitioned to actual altitude. A low ridge allows for high-repetition cycles of takeoffs and landings, which is essential for building confidence.
Here is the professional English translation of your training plan:
1. Forward Launch — For Light Winds
When the wind is light (0–2 m/s), an energetic run is required to ensure the wing inflates and takes its proper shape.
Preparation: Spread the wing exactly against the wind. Ensure you are holding the A-risers correctly in your hands.
Inflation: Begin moving forward by leaning your body weight into the harness. Do not release the A-risers until the wing is directly above your head (at the Zenith).
Control: Once the wing is overhead, perform a Visual Check to ensure the lines are clear. Only then add speed to achieve takeoff.
2. Reverse Launch — For Moderate Winds
When the wind is between 3–6 m/s, a reverse launch is ideal as it allows you to maintain visual contact with the wing during inflation.
Position: Stand facing the wing with the risers crossed.
Inflation: Gently pull the A-risers. If the wind is strong, take a step toward the wing to reduce its power.
Turnaround: Once the wing stabilizes at the zenith, quickly pivot/turn into the flight direction (always turn toward the side of the top riser).
The Run: Immediately after turning, run energetically down the slope to gain airspeed.
3. Ridge Soaring
The goal of practicing on a small ridge is to feel the Dynamic Lift.
Trajectory: Fly parallel to the ridge using "Figure-8" maneuvers.
Safety: Always make your turns away from the ridge (into the wind/valley) to prevent the wind from pushing you into the slope.
4. Safe Landing Technique
Landing is the most responsible part of the flight.
Approach: Use the standard "U-Approach" (DBLF: Downwind, Base, Leg, Final).
Into the Wind: Landing must always be done against the wind! This significantly reduces your ground speed.
The Flare: At approximately 1–2 meters above the ground, pull both toggles (brakes) down energetically to the full extent. This "stalls" the wing in the air for a soft touchdown on your feet.
Post-Landing: Immediately "kill the wing" (collapse it) to prevent the wind from dragging you.
Practical Tips for the Instructor:
Radio Communication: Maintain constant contact with the student to provide real-time guidance.
First Flights: Have the student perform the first few landings straight ahead without complex maneuvers to focus on the flare.
Video Analysis: Record takeoffs and landings so you can review mistakes with the student afterward.